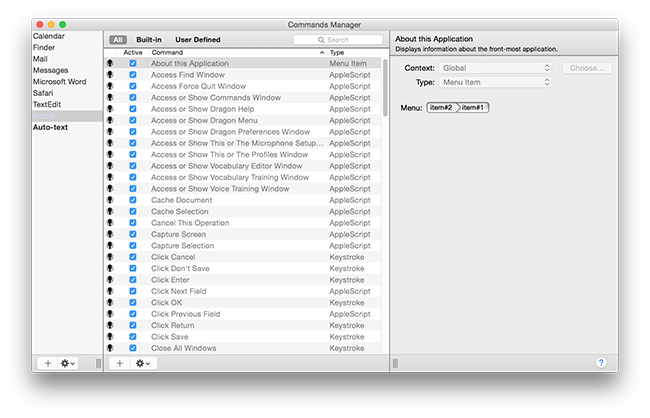
The Commands Manager
The Commands Manager allows you to view built-in commands and add your own.
Commands may be modified, created, activated or deactivated, and deleted.
To open the Commands Manager
-
Click the
 icon in the menu bar and select Manage Commands...
You will see a window like this one:

Context panelThe Context panel is on the left side of the window. It allows you to filter the commands shown based on the context in which they are available (globally or in a specific application). What you can do in the Context panel
You may want to add a context if you want to create commands for a context that is not included, such as an application not included in the built-in commands.
You can't delete any of Dragon's pre-existing contexts, such as Global or Finder. The last context in the list is Auto-text. Select the Auto-text context to add Auto-text commands, or click the |
Commands list panelIn the middle panel, you will see a list of all commands available in the selected context. For example, in the window above, Global is selected in the Context panel, so all the commands listed are available globally. The symbol to the left of each command indicates how it was created:
At the top of the middle panel, click All, Built-in, or User Defined to show the selected command type. What you can do in the Commands list panel
A deactivated command still exists, but it is not listed in the Available Commands window, and you cannot issue the command. Deactivating unused commands can be useful if you're certain you don’t need them.
See Create a command for more on creating custom commands. Duplicating a command can be useful if you want to use an existing command as a template for a new one. You can't delete a built-in command. |
Details panelThe details panel on the right side of the screen shows information about the currently selected command, including:
Important: To avoid misrecognition and conflicts with existing commands, it is important that you choose a name that is at least two words. Avoid words such as "that," "one," "two," etc. You will also see a detailed description of the command; the exact content will vary depending on the command type. What you can do in the Details panel
You can't edit a built-in command.
When you close the Commands Manager, you will be prompted to save any changes you made. Click Save, or to discard all changes you made while using the Command Manager, click Don't Save. Click Cancel to stay in the Commands Manager. |
 icon at the bottom of the panel to add a context.
 icon and select
  icon indicates a built-in command.
  icon indicates a user-defined command.